

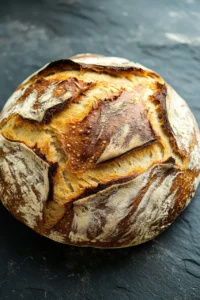
There’s something quietly satisfying about the slow, patient process of making bread without the fuss of kneading. It’s like the bread is doing all the work while you get to sip your morning coffee, maybe distracted by a half-read book or a sudden thought about what to make for dinner. I remember the first time I tried this vegan no knead bread—my kitchen smelled like a little bakery, and I was nervously poking at the dough, wondering if it looked right. It wasn’t perfect; the dough was sticky, a bit messier than I expected, and I left a flour trail on the counter. But when that golden crust finally emerged from the oven, crisp and crackling, it was worth every moment of waiting. The texture was tender inside, with a rustic, uneven crumb that felt honest and homemade—nothing like the uniform loaves from the store.
This bread has a comforting unpredictability. Each loaf carries a little story of the day it was made—sometimes a bit more bubbly, sometimes with a thicker crust. It’s simple, unpretentious, and a little forgiving if you forget about it for an hour or two. It’s not fancy, but it’s real.
Why You’ll Love It
- The hands-off method means you don’t need to be a baker to get great results. No kneading, no fuss.
- The crust turns out beautifully crusty, perfect for dipping or toasting, though it’s a bit of a tradeoff for the soft, airy crumb inside.
- Uses just a few pantry staples, so you probably have everything on hand already.
- It’s simple—and that’s kind of the point. It’s about enjoying the process as much as the loaf itself.
If you’re worried about timing, don’t sweat it too much. The dough is forgiving and can hang out longer at room temperature if you get caught up in the day. And for those moments when you want fresh bread but can’t knead or don’t want to spend all day in the kitchen, this recipe fits right in.
PrintVegan No Knead Bread
This easy vegan no knead bread recipe yields a crusty, flavorful loaf with minimal effort. Perfect for beginners, it requires no kneading and uses simple pantry ingredients.
- Prep Time: 15 minutes
- Cook Time: 45 minutes
- Total Time: 1 hour 15 minutes
- Yield: 8 slices 1x
Ingredients
3 cups (375 grams) all-purpose flour
1/4 teaspoon instant yeast
1 1/4 teaspoons salt
1 1/2 cups (360 ml) warm water
Instructions
In a large mixing bowl, combine the all-purpose flour, instant yeast, and salt. Stir well to evenly distribute the ingredients.
Pour the warm water into the dry ingredients and mix with a wooden spoon or spatula until a shaggy dough forms. The dough will be sticky and rough.
Cover the bowl tightly with plastic wrap or a clean kitchen towel. Let the dough rest at room temperature for 12 to 18 hours, until the surface is dotted with bubbles and the dough has doubled in size.
After the dough has risen, lightly flour a clean work surface and turn the dough out onto it. Fold the dough over itself once or twice to shape it into a rough ball. Do not knead.
Place a piece of parchment paper inside a large bowl or proofing basket and transfer the dough seam side down onto the parchment.
Cover the dough with a kitchen towel and let it rest for 1 to 2 hours, until it has risen noticeably.
About 30 minutes before baking, preheat your oven to 450°F (230°C). Place a heavy covered pot (such as a Dutch oven) with its lid inside the oven to heat.
Carefully remove the hot pot from the oven. Lift the parchment paper with the dough and place it into the pot. Cover with the lid and bake for 30 minutes.
After 30 minutes, remove the lid and bake for an additional 15 minutes, until the bread is golden brown and crusty.
Remove the bread from the pot and transfer it to a wire rack. Let it cool completely before slicing.
Kitchen Notes: You won’t need any special gear beyond a sturdy pot with a lid, like a Dutch oven, which helps create that steamy environment for a crisp crust. I usually enjoy a thick slice with a smear of jam or alongside a bowl of soup on a chilly afternoon. If you want to switch it up, I’ve tried adding a handful of herbs or some olives before the final rise—nothing fancy, but it adds a nice twist. Sometimes I sprinkle seeds on top just before baking, though I haven’t tested all variations thoroughly. The dough’s sticky nature can be tricky, so dust your hands and surface lightly to keep it manageable.
FAQ
Can I use whole wheat flour? You can, but the bread might be denser and need a bit more water. I haven’t perfected the ratio for whole wheat yet.
How long does it keep? It’s best eaten within a couple of days at room temperature, but it freezes well if wrapped tightly.
Do I have to use a Dutch oven? It helps with the crust, but you can bake on a baking sheet covered with an oven-safe bowl if needed.
Can I make it gluten-free? This recipe isn’t designed for gluten-free flours and might not rise properly.
This loaf quietly changes the way you think about homemade bread—no stress, just warmth and a little magic from your oven. If you try it, save this post for later and maybe plan your next cozy kitchen day.